Making sushi at home is easier than you might think. You will probably have to make a special trip to the store for ingredients, but Asian markets are usually relatively inexpensive. Your only splurge is going to be the sushi-grade fish. You will also need a bamboo rolling mat if you’re making rolls, which is what we did for this particular dinner. There is no shortage of how-to videos on YouTube or links to websites with pictures and recipes when you do a search on the Internet. I have included a few basic tips we’ve learned by making sushi at home, as well as some recipes. *Note: recipes below were adapted from Sushi, by Lulu Grimes.
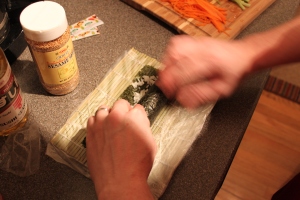
* Wrap your bamboo rolling mat in plastic wrap. This will make it easier to roll, the mat won’t stick to the rice, and you won’t have to spend time picking particles of rice out of your mat either.
* Invest in a mandolin if you don’t already have one. They are the best when it comes to slicing and shredding with some consistency. I love how everything comes out so perfect! You don’t need to spend a fortune on one either. They can be found at an Asian market or a Chinatown shop for a fraction of the cost of any mainstream retailer.
* Imitation crab sticks work fine for California rolls. They’re actually much easier to work with too, for this purpose! They also freeze well if you don’t use the whole package for your sushi rolls.
* Sriracha is awesome! We mix it with mayo and a little chili oil for spicy tuna rolls, but you can add it to virtually anything to spice it up. It’s even good on pizza!
* Only buy from a grocer that sells sushi or sashimi grade fish. If you’re eating raw fish, you’re always running a risk of getting sick. However, “sushi or sashimi grade” fish is supposed to have been treated a certain way (i.e. freezing, storage temps, etc.) to destroy parasites. The fish should be clearly labeled, and often is pre-packaged in smaller quantities. This is perfect for sushi making, since a little goes a long way.
* 2 cups of uncooked sushi or botan rice yields 4 cups of cooked rice. This is enough for about 8-10 rolls.
* We haven’t typically followed many recipes verbatim when making sushi. A lot of the time I’ll just purchase a handful of different vegetables and fish and we’ll just sort of make it up as we go along. However, I have listed a few basic recipes that are easy for beginners.
California Roll
Sushi rice
Nori sheets
Avocado, cut into thin sticks (ripe)
Crab sticks
Cucumber, cut into thin sticks (I like to use English or seedless cucumbers)
Wasabi paste and pickled ginger for garnish (optional)
Spread a portion of the rice in an even layer on the nori, leaving about ¾ of an inch of nori visible on the ends. Layer the crab sticks, avocado and cucumber on top of each other, keeping them parallel to the edge of the nori nearest you.
To roll the sushi, fold the mat over, starting at the end where the ingredients are, and tucking in the end of nori to start the roll. Keep rolling, lifting up the mat as you go and keeping the pressure even but gentle until you have finished the roll. Moisten the top of edge of the nori with water to seal the sushi roll closed. Don’t worry if anything falls out the sides, just push it back in. The edges might look a little ragged, but you can just sample those yourself! Make sure you slice the roll with a very sharp knife into even pieces. Wetting the knife will help too.
Salmon, Asparagus, and Mayonnaise Rolls
Sushi rice
Nori sheets
Asparagus spears, blanched and cut into thin strips
Salmon filet, sushi grade, cut into thin sticks
Japanese mayonnaise
Wasabi paste and pickled ginger for garnish (optional)
Spread a portion of the rice in an even layer on the nori, leaving about ¾ of an inch of nori visible on the ends. Layer the salmon and asparagus on top of each other, keeping them parallel to the edge of the nori nearest you. Spread some of the mayonnaise on top of the salmon and asparagus.
To roll the sushi, fold the mat over, starting at the end where the ingredients are, and tucking in the end of nori to start the roll. Keep rolling, lifting up the mat as you go and keeping the pressure even but gentle until you have finished the roll. Moisten the top of edge of the nori with water to seal the sushi roll closed. Don’t worry if anything falls out the sides, just push it back in. The edges might look a little ragged, but you can just sample those yourself! Make sure you slice the roll with a very sharp knife into even pieces. Wetting the knife will help too.
Spicy Tuna Rolls
Sushi rice
Nori sheets
Tuna, sushi grade, diced
Japanese spicy mayonnaise (recipe below)
Wasabi paste and pickled ginger for garnish (optional)
For the spicy mayo, mix together some Japanese mayonnaise, Sriracha, a dash of rice vinegar, and a dash of chili oil. You will want to adjust the quantities until have the desired level of heat in your sauce. Mix the diced tuna with the spicy mayo.
Spread a portion of the rice in an even layer on the nori, leaving about ¾ of an inch of nori visible on the ends. Spread the tuna mixture in a line, keeping them parallel to the edge of the nori nearest you. Spread some of the mayonnaise on top of the salmon and asparagus.
To roll the sushi, fold the mat over, starting at the end where the ingredients are, and tucking in the end of nori to start the roll. Keep rolling, lifting up the mat as you go and keeping the pressure even but gentle until you have finished the roll. Moisten the top of edge of the nori with water to seal the sushi roll closed. Don’t worry if anything falls out the sides, just push it back in. The edges might look a little ragged, but you can just sample those yourself! Make sure you slice the roll with a very sharp knife into even pieces. Wetting the knife will help too.
 We served the sushi rolls with some steamed edamame and homemade egg rolls. But even just the sushi can be a meal in itself!


